


Face detection is truly amazing technology, something I’ve always known to be true. But a recent visit to a sandwich shop in Tokyo really opened my eyes. They accepted payments through face recognition! This experience made me see how this method is becoming crucial for security and personal verification, possibly even replacing passwords or security pins sooner than I expected. Its ability to identify people accurately from images or videos is incredibly useful for many applications. That’s why I’ve decided to explore the world of face recognition further. I’ll be writing a series of articles focused on a Python-based approach that uses deep learning and computer vision to make face recognition systems more reliable and efficient. In this article, we’ll dive into the initial phase of face recognition: the fascinating process of face detection and embedding extraction.
Table of contents
Face detection vs face recognition
Face detection is the process of identifying human faces within digital images or video frames. It does not concern itself with the identity of the face; rather, its goal is to determine whether any faces are present in the given input and, if so, to locate them within the space of the image. Face detection is a prerequisite for face recognition and performs several critical functions:
- Localization: It involves finding the location and size of every face in an image, typically represented by bounding boxes.
- Orientation and Scale: Detection algorithms can identify faces at various scales (close-up or far away) and orientations (frontal, profile), though their effectiveness may vary.
- Preprocessing Step: Acts as a foundational step for further processing, such as face recognition, by isolating the facial area from the rest of the image.
Techniques like HAAR cascades and DNN-based methods (e.g., the SSD framework) are commonly used for face detection. These methods vary in complexity, accuracy, and computational requirements.
What is a face’s embedding?
At its most fundamental level, embedding extraction transforms the unique features of a face from an image into a compact, numerical form known as an “embedding”. Althought the main objective of this post is to show you how to perform face recognition on an image, the embeddings could be imagined as the fingerprint of a face, which will be required in further posts to train a model in order to achieve an efficient face authentication process. This embedding is essentially a high-dimensional vector that represents the key characteristics of the face, distilled down to a form that can be easily compared with other embeddings.
Understanding Embedding Extraction: Haar Cascades
The generation of face embeddings involves several sophisticated steps, starting from preprocessing the image to finally obtaining a high-dimensional vector that represents the face’s key characteristics. A critical part of this process is detecting the face within the image, for which two popular techniques are HAAR cascades and Deep Neural Networks (DNNs).
HAAR cascades are a machine learning-based approach to object detection, which was an early breakthrough in the ability to detect faces within images with reasonable accuracy and speed. This method relies on HAAR features, which are simple contrast features that can be computed very quickly (check Figure 1 for a graphical representation). A HAAR cascade classifier employs a cascade function to filter out a large portion of the image in the initial stages and then applies more complex criteria to the remaining areas, significantly reducing computation time.
- Pros:
- Speed: HAAR cascades can process images quickly, making them suitable for real-time applications.
- Low Resource Requirements: They require less computational power than DNNs, making them viable for devices with limited processing capability.
- Cons:
- Accuracy: They are less accurate in detecting faces, especially in challenging conditions such as low light, high variability in facial orientation, or partial occlusions.
- Rigidity: HAAR cascades struggle with variations in facial expressions and angles since they rely on predefined features.
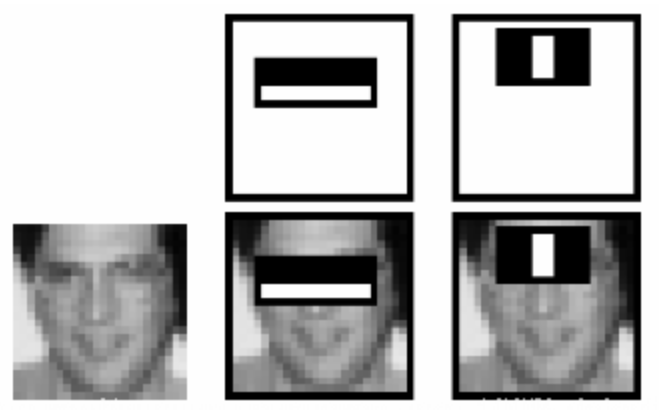
Figure 1: A graphical representation of how the Haar cascades identify and extract facial features to calculate the embedding. Image sourced from OpenCV’s official tutorial on using Haar Cascades.Want to learn more? Check a deeper explanation of the Haar cascades algorythm here!
A better approach (in my opinion): DNNs
In contrast to HAAR cascades, DNNs, especially convolutional neural networks (CNNs), represent a more advanced approach to face detection and embedding extraction. DNNs learn to identify and extract features directly from images through extensive training on large datasets, allowing for the capture of complex patterns and variations in facial features. The pros and cons of using DNNs (at least in my opinion) are:
- Pros:
- Accuracy: DNNs significantly outperform HAAR cascades in accuracy, especially in challenging conditions such as varying lighting, angles, and facial expressions.
- Flexibility: They are more adaptable to a wide range of facial features and can handle a broader variety of face orientations, expressions, and occlusions.
- Robust Embeddings: DNNs not only detect faces but also extract high-quality embeddings that capture deep, discriminative features of the face, facilitating more accurate and reliable face recognition. Also there are already pre-trained models with solid results that you can use yourself for further development!
- Cons:
- Computational cost: For applications requiring high speed and low computational resources (e.g., basic surveillance on low-power devices), HAAR cascades might be preferred due to their efficiency.
What model to use? An overview of the Res10_300x300 SSD Model
The Res10_300x300 SSD (Single Shot MultiBox Detector) model is based on a deep learning framework that combines the ResNet (Residual Network) architecture with the SSD framework. It’s designed for object detection tasks, including face detection, and is known for its balance between accuracy and speed, making it ideal for real-time applications. Some of the key features of this model are:
- Speed and Efficiency: The SSD framework allows for detecting objects in a single pass through the network, significantly speeding up the detection process without sacrificing accuracy.
- ResNet-Based Backbone: Incorporates ResNet’s deep residual learning framework, enhancing the model’s ability to learn from vast amounts of data and improving its feature extraction capabilities.
- 300×300 Resolution: Operates on images resized to 300×300 pixels, providing a good balance between processing speed and the level of detail captured for accurate face detection.
Implementing Face detection and Embedding extraction
Now that you have a general context on what is face detection and what options you have for implementing it, let’s dive deeper into how to actually code it. As I usually do, I will use Python for the implementation of a small controller that will allow us to extract the embeddings of any detected faces within an inputed image.
Before you start, make sure to install the required libraries below:
pip install opencv-python-headless
pip install face_recognition
pip install tqdm
We will use the Res10_300x300 model to detect the faces on a given image. Then, we will use the face_recognition library to extract the embeddings themselves, which later will prove to be usefull when we try to achieve the precious process of face authentication. Let’s see the controller’s code itself!
'''
Code by Rodrigo C. Curiel, 2024.
Check this and more snippets at www.curielrodrigo.com
'''

# Import the libraries we will need
import cv2
import os
import pickle
import face_recognition as fr
from tqdm import tqdm

# Mean values for B, G, and R channels, used for image preprocessing before feeding into a deep neural network (DNN).
# Justification: https://arxiv.org/abs/1512.03385
class FaceDetectionMeanValues:
    B = 104.0
    G = 117.0
    R = 123.0

# Main controller
class EmbeddingExtractionController:
    # The class' constructor
    def __init__(self, config_file : str, model_file : str):
        # A local instance for the face_detection DNN
        self.face_detection_deep_neural_network = cv2.dnn.readNetFromCaffe(config_file, model_file)

    # Get embeddings from image
    def get_embeddings_from_image(self, image_path, face_detection_confidence):
        # Set a variable to store the embedding
        embedding = None

        # Open image with CV2 to transform it into a 2D array
        image = cv2.imread(image_path)

        # Get a blob to feed the DNN from the image
        blob = cv2.dnn.blobFromImage(
            # Input image. Resized to match the expected input size of the Deep Neural Network
            cv2.resize(image, (224, 224)),
            # Scale factor of 1. No image rescaling needed
            1.0,
            # The expected image size for the Deep Neural Network
            (224, 224),
            # Mean values to use for pre-processing the image
            (FaceDetectionMeanValues.B, FaceDetectionMeanValues.G, FaceDetectionMeanValues.R)
        )

        # Feed the blob to the DNN and find faces
        self.face_detection_deep_neural_network.setInput(blob)
        faces = self.face_detection_deep_neural_network.forward()

        # If no faces could be detected, continue\
        # Images with more than one face are rejected, but you could adjust this for your application case!
        if self._get_amount_of_faces(faces, face_detection_confidence) != 1:
            raise BaseException ("This image does not contain exactly one face", image_path)

        # Loop through the detected faces
        for i in range(faces.shape[2]):
            # Confidence of the face detection
            confidence = faces[0, 0, i, 2]
            if confidence > face_detection_confidence:
                # Get the pivot coordinates of the bounding box
                x_ = int(faces[0, 0, i, 3] * image.shape[1])
                y_ = int(faces[0, 0, i, 4] * image.shape[0])
                w = int(faces[0, 0, i, 5] * image.shape[1]) - x_
                h = int(faces[0, 0, i, 6] * image.shape[0]) - y_

                # Apply the margin to the bounding box coordinates
                margin = 50
                x_ -= margin
                y_ -= margin
                w += 2*margin
                h += 2*margin

                # Make sure none of them are negative
                if x_ < 0:
                    x_ = 0
                if y_ < 0:
                    y_ = 0

                # Resize the detected face to required image size
                size = (224, 224)

                # Detected face region
                detected_face_region = image[y_: y_ + h, x_: x_ + w]

                # Resize the image to only focus on the face
                # This could be saved for checking the detected face!
                resized_image = cv2.resize(detected_face_region, size)

                # This converts the face into a face embedding, a 128-d vector.
                # We will use this on later posts to train a face-authentication model
                embedding = fr.face_encodings(resized_image)[0]

                # Show the detected face
                # You can remove this if you dont need it, but it is good to be able to see the results of the code!
                cv2.imshow("Recognized Face", resized_image)
                cv2.waitKey(0) # Wait for any key to be pressed before closing the window
                cv2.destroyAllWindows()

        return embedding

    # Dump embeddings to a pickle
    def dump_embeddings_to_pickle(
        self,
        embeddings: any,
        path_embeddings_destination: str,
        embeddings_file_name: str,
        allow_rewrite_pickle: bool = False
    ):
        # Guard for output directory not existing
        pickle_path = os.path.join(path_embeddings_destination, embeddings_file_name + ".pickle")
        if not os.path.exists(path_embeddings_destination):
            os.makedirs(path_embeddings_destination)
        else:
            # Guard for pickle already existing and no rewrriting allowed
            if os.path.exists(pickle_path):
                # Check for rewritting permissions
                if not allow_rewrite_pickle:
                    raise BaseException('The embeddings file already exists. Allow rewritte to continue ', pickle_path)

                # Delete the pickle before continuing
                os.remove(pickle_path)

        # Dump the embeddings to the pickle file
        with open(pickle_path, 'wb') as file:
            pickle.dump(embeddings, file)

    # Get the amount of faces detected on an image
    def _get_amount_of_faces(self, dnn_prediction, face_detection_confidence):
        return sum(1 for i in range(dnn_prediction.shape[2]) if dnn_prediction[0, 0, i, 2] > face_detection_confidence)
Let me explain a the code above in deeper detail:
- First, we import the necessary libraries:
- cv2 (OpenCV) for image processing and DNN operations.
- os for file path operations and directory access.
- pickle for saving and loading serialized data.
- face_recognition for generating face embeddings.
- tqdm for progress bars during lengthy operations.
- Then, we initialize our main class.
- The constructor initializes a DNN model for face detection using OpenCV’s dnn.readNetFromCaffe, requiring a config file and a model file. This model is designed to detect faces within inputed images.
- The function get_embeddings_from_image processes a single image to detect faces and extract embeddings. It includes several steps:
- We read the image and converts it to a blob using OpenCV, with resizing to (224, 224) pixels.
- It uses the DNN to detect faces in the blob.
- Afterwards, we apply logic to ensure exactly one face is detected, suited for scenarios like authentication where individual face processing is required.
- It extracts and resizes the detected face region, then uses the face_recognition library to generate a 128-dimensional embedding.
- I also added a small piece of code to display the image itself whenever the face is detected.
- Some additional features are
- dump_embeddings_to_pickle: Serializes and saves the embeddings to a .pickle file, with error handling for file overwrites. This pickle file will be usefull for anyone looking to use the embeddings to train a model for face authentication!
- _get_amount_of_faces: Helper function to count the number of faces detected with confidence above a threshold.
Using the controller
Now that we have the embedding extractor class, lets check how to use it! By the way, you will need to download the Res10_300x300 model and its fine-tuned weights for face recognition. My advice is to check the latest version of it here, but I also attach the one I used. Click the button below to download it!
'''
Code by Rodrigo C. Curiel, 2024.
Check this and more snippets at www.curielrodrigo.com
'''

# Import the controller itself.
import EmbeddingExtractionController from embedding_extraction_controller.py

# Model for face detection. Make sure to fix this to fit your own paths!
config_file='./res10_300x300_ssd_iter_140000/deploy.prototxt.txt'
model_file='./res10_300x300_ssd_iter_140000/res10_300x300_ssd_iter_140000.caffemodel'

# Information of the target image you will use
path_embeddings_destination = './'
target_file = './your_test_image.png'

# Instance a controller
controller = EmbeddingExtractionController(
    config_file=config_file,
    model_file=model_file
)

# Perform the extraction from the target image
embedding = controller.get_embeddings_from_image(
     image_path = target_file,
     # You can change this if the embeddings are not being obtained!
     face_detection_confidence=0.9
)

# Dump the embeddings
controller.dump_embeddings_to_pickle(
    embeddings=embedding,
    path_embeddings_destination=path_embeddings_destination,
    embeddings_file_name='my_embedding',
    allow_rewrite_pickle=True
)
This code will call the EmbeddingExtractionController’s get_embeddings_from_image method to be able to pull the face and embeddings from your target image. If everything ran smoothly, you should see the embeddings in your root folder ready to be used whenever you need to train a face authentication model!
Conclusion
Understanding the distinction between face detection and face recognition is essential for anyone involved in the development or deployment of facial analysis technologies. While detection serves as the gateway, recognition unlocks the full potential of what facial analysis can offer, from enhancing security measures to creating more personalized and interactive technological experiences (check more on my latest post about face authentication!). Together, they represent a powerful toolset in the ever-expanding field of artificial intelligence and computer vision! I hope this post serves you well and helps me introduce how you can use simple models like SVMs to tell images of different persons apart. Stay tuned for that post soon!
One response
[…] few days ago, I shared a post about achieving face detection and embedding extraction (if you haven’t read that, I highly recommend giving it a look first!). Today, I’m […]